• Home
  • Disney
  • Recipes
  • DIY
  • Meet Jess
  • Disclosure & Privacy Policy
  • Contact
  • Shop Pure Magic Design Co.
  • Cart
    • Amazon
    • Email
    • Facebook
    • Instagram
    • Pinterest
    • YouTube

The Rambling Introvert

Your guide to the world of Disney and beyond

Categories: Disney, DIY

DIY Haunted Mansion Tombstones

Walking the queue of the Haunted Mansion is one of my favorite spots in the parks. The attention to detail of every aspect of that ride inside and out is just amazing. Now at Disneyland they have the stacked crypts but at Walt Disney World they have the iconic individual tombstones across the Haunted Mansion grounds. So I wanted to recreate those iconic tombstones for my own yard to display for Halloween!

Now I have to say this may be my favorite spooky season DIY yet! This project wasn’t hard but it did take a lot more time and effort to complete. With that being said, I absolutely love having these in my yard for Halloween. So let’s get going and I’ll walk you through how to make your own!

***This post contains affiliate links. As an Amazon Associate I earn from qualifying purchases at no additional cost to you***

WHAT YOU’LL NEED

You don’t need a ton of supplies to make these tombstones, just a few quick things and some patience. Here’s what I used:

• 4×8 plywood board

• Palm sander

• Dark grey paint

• Pewter grey paint

• Black paint

• White paint

• Paintbrushes and foam brushes

• Liquid Nails

• Wooden stakes

HOW TO MAKE YOUR TOMBSTONES

To start, you need trace out your tombstones. I used a 4×8 sheet of plywood and to make sure they were all similar in size, I cut my 4×8 down the middle so I had two 2×8 boards. I could have made 10 tombstones out of it, but I chose to only do 9.


Once I cut my board in half, I started tracing my tombstones out. Most of them were about 14 inches wide and two feet tall but I did two that were shorter and wider to mix things up. I just got on Google and looked up different Haunted Mansion tombstones and then traced them out to match on my board. Once I had all my tombstones traced, it was time to cut.

Because the designs I chose had all sorts of curves and angles, I used a jigsaw to cut my tombstones out. Just make sure you have your wood on a stable surface so you don’t hurt yourself. If your wood splinters on the edge as your cutting don’t worry, we’ll fix that in a minute.
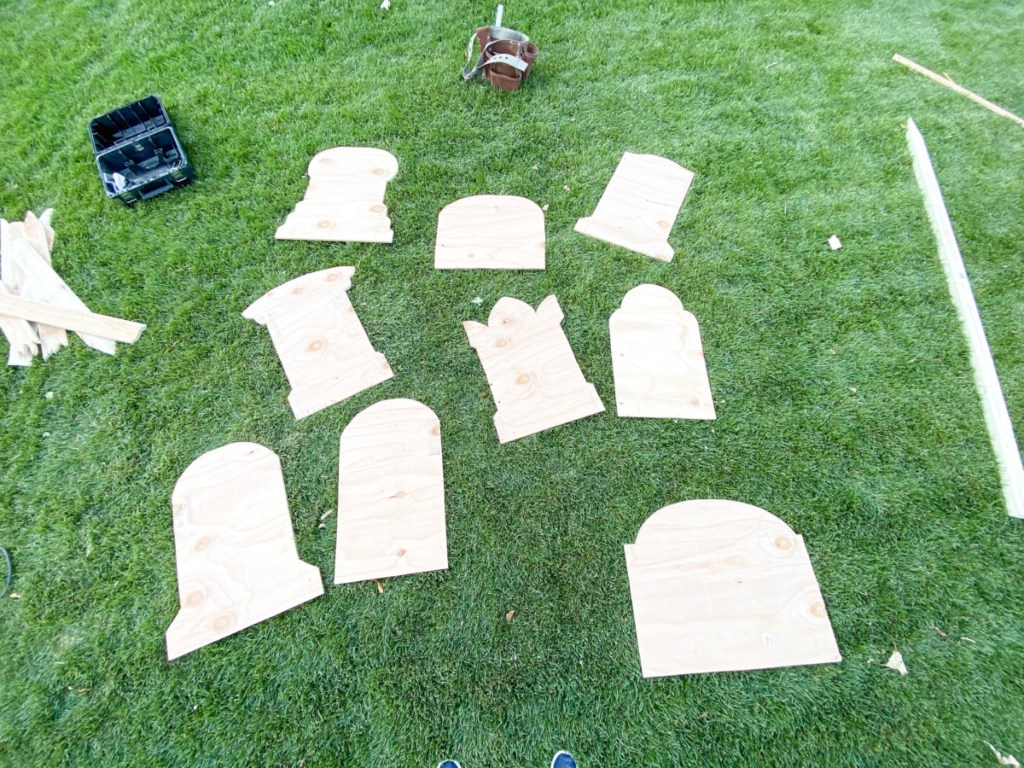
Once my tombstones were cut out, the edges were pretty rough. So I took a palm sander and sanded the entire tombstone, making sure to really get all the edges and corners smooth. I did go through a few sand paper replacements to do all of them so make sure you have a few extras on hand. Sanding them down will help make them easier to paint and prevent your paintbrushes from getting ruined!

Once you’ve sanded them down, it’s time to paint. For the base paint for my tombstones, I did two layers of dark grey paint. I used a bigger foam paintbrush for this so I got a smooth finish. You’ll notice that the grain of the wood will still show through but that’s okay, no need to worry about that.

Once my tombstones were painted, I wanted to add dimension to them. I took pewter grey paint and added a little bit of black and the smallest amount of white and mixed it until I got a color just a little darker than the grey I used as the base color. Once I had the right color, I took a larger paintbrush and randomly painted streaks across each tombstone so they looked a little weathered and distressed.

Once that paint was dry, it was time to add more dimension to some of my tombstones. Some of my tombstones were based off ones in the parks that had tiered bottoms or something like that so to replicate that, I used paint to shade mine. I took my paint and mixed them to get different shades to get the dimension and shading I wanted on my tombstones. To create shadows, I painted a line of the paint and then I dipped my brush in water and used that water to lighten up the line and drag the watered down paint down more so it gave it a shaded, 3D look.

Once your tombstones are all painted and textured, all that’s left to do is add the writing to each one. I originally tried to do this with sharpie but it didn’t show up enough against the grey paint. So what I did is I traced the words and designs of each tombstone in sharpie and then I used a small paintbrush and went over the writing with black paint. That made it stand out much more and looked way better.

The only tombstone that required more than black paint was the Madame Leota tombstone. For this one I just put black, pewter grey, and white paint on a plate and mixed them together to make different shades of grey and used those to paint and shade her face.

After the tombstones are all painted and dry, it’s time to get them ready to stick in your yard. I got a pack of wooden stakes to use to stick them into my grass. To make them match the tombstones, I just put a quick layer of dark grey paint on them and let them dry.

Now it’s time to assemble! To secure the stakes to the tombstones, I left 5 inches of the stake hanging out from the bottom of the tombstone so I had it long enough to go into the ground and keep them put. Then, I made sure the stake was in the middle of the tombstone, applied some liquid nails between the stake and the back of the tombstone, then from the front of the tombstone I stapled 3-4 staples to secure the tombstone to the stake even better. Then I set them out to allow the liquid nails to harden completely. Then I just touched up the tombstones with a little paint where the staples were if they needed it.

All that’s left to do now is to get those tombstones in the ground. If the dirt/grass in your yard is soft enough, you can just push them into the grass but be careful not to push too hard so you don’t break the stakes. My yard wasn’t very soft so I took a piece of wood, put it on top of the stake on the back of the tombstone, and used a hammer to hammer them into the ground. The extra board I put on top of the stakes prevented me from damaging or splintering the top of the stakes so try to find something like that to make a buffer as hammer them in.

And there you have it! Fun Haunted Mansion tombstones for your own yard, perfect for spooky season! For more spooky season DIY’s, click here.

Share this:

  • Share on Pinterest (Opens in new window) Pinterest
  • Share on Reddit (Opens in new window) Reddit
  • Share on X (Opens in new window) X
  • Share on Tumblr (Opens in new window) Tumblr
  • Share on Facebook (Opens in new window) Facebook
Tweet
Share
Pin45
Share
45 Shares

You may also like

About Jess

Jess is a Disney lover through and through and loves sharing her knowledge by sharing tips and tricks for the parks and her favorite products to help others have the most magical vacation possible.

Meet Jess

Meet Jess

Hey there, I'm Jess and welcome to The Rambling Introvert!

As someone who loves Disney but doesn't get to visit as often as I would like, I created the Rambling Introvert to spread tips, tricks, and more to help you plan the most magical Disney vacation possible.

Here you will also find Disney recipes, DIY's, and more. So if you love Disney, this is the place for you!

More About Jess

  • Facebook
  • Instagram
  • Pinterest
  • YouTube

Search the Blog

Follow @theramblingintrovert

theramblingintrovert

✨Disneyland tips & tricks, magic at home, and a dash of real life
📍Utah
✨Book your trip & discount tickets 👇🏼

Hi there, I’m Jess ✌🏼 A little reintroduction sin Hi there, I’m Jess ✌🏼

A little reintroduction since there’s a lot of new friends around here! I’ve been doing this for 7 years, before doing content creation I was a history teacher! You can find me crafting, binging a good show, hanging out with my little family, or listening to a good audiobook in my free time. I love Disneyland and know how magical the parks can be, so I love spreading my knowledge with others so you can all have an enjoyable vacation as well!

Do we have anything in common??

PS. Flynn Ryder is my favorite PRINCE 😂 guess that’s what I get for not proofing my own content closely enough haha!
2027 calendar preorders are still open! Preorder 2027 calendar preorders are still open! 

Preordering guarantees the size/finish you want and orders should ship by mid November! Comment CALENDAR for the link to shop!
Disneyland just raised their ticket prices, but yo Disneyland just raised their ticket prices, but you don’t have to pay full price! Get maximum savings with @getawaytoday better than Black Friday deals!

Here’s what you need to know:
• Save up to $75 over gate prices at Disneyland when you book by October 19, 2026
• Get Adults at Kids’ Prices on 3-Day or longer Disneyland tickets
• Save up to an extra $50 with Bundle & Save when you  book tour Disneyland hotel & tickets together
• Book for just $149 down with their reduced Layaway Plan and make interest-free payments over time, with payment due just nine days before travel
• Tickets are refundable within 365 days of purchase and have no blackout dates!
• Use code RAMBLING10 to save additional money on your 2+ ticket/2+ night hotel package!

Ready to get started? Comment “BOOK” and I’ll send you the link to get these savings!

As always if you have any questions, drop them below!
Let’s pack my park bag ✨ These are some of my tri Let’s pack my park bag ✨

These are some of my tried and true favorites for my family and I’s park days, comment “PACK” and I’ll send you the link to it all!
Can’t love it all 🤷🏻‍♀️ What are your no’s in the Can’t love it all 🤷🏻‍♀️

What are your no’s in the parks?
I’ve been sitting on posting this for weeks. I don I’ve been sitting on posting this for weeks. I don’t think there anything wrong with content creation and the parks, it can have lots of benefits for trip planning or for those who can’t experience the parks often, but I think more and more lately content creation is starting to detract from the experiences other people may have while in the parks.

What are your thoughts?
Let’s just pretend all this hasn’t been up for a m Let’s just pretend all this hasn’t been up for a month already 😏

Comment “LINK” and I’ll send you everything I used to get ready for Halloween this year!
2027 Disneyland calendars are here and available f 2027 Disneyland calendars are here and available for preorder now in my shop! 

All calendars should ship out within the next 6 weeks, but depending on production time, it could be sooner than that!

You can choose from 12x18 top bound or 8.5x11 center bound styles, with a matte or pearl finish (the pearl finish has a shimmer to the pages and I think makes colors look slightly more vibrant)

Shop now at the link in my bio or comment “CALENDAR” and I’ll send the link right to you!
If you’re visiting Disneyland in October, here’s w If you’re visiting Disneyland in October, here’s what you can expect:

CLOSURES
• Mad Tea Party- reopening TBD
• Indiana Jones- reopening TBD
• It’s a small world- closed 10/30-TBD

OTHER IMPORTANT DATES & EVENTS
* Halloween Time happening all month long
* Columbus Day/Indigenous Peoples’ Day on October 12th
* Fall break crowds will be hitting mostly the second and third weeks of the month
* Oogie Boogie bash nights on October 1st, 4th, 6th, 8th, 11th, 13th, 15th, 18th, 20th, 22nd, 25th, 27th, 29th, and 31st. DCA will close at 6 pm to all non ticketed guests.
* Halloween on October 31st
My favorite ride evacuation experience was on the My favorite ride evacuation experience was on the Haunted Mansion. We got stuck right at the bottom of the last hill looking at the caretaker and his dog so when they evacuated us, we got to walk through the entire graveyard scene with the lights on which was so cool to see the little things you don’t normally notice, as well as the mechanics behind a lot of the ride elements. Definitely my favorite ride evacuation I’ve ever had!

What about you? Which ride would you pick, or what’s your most interesting evacuation story?
Just pick the number that speaks to you… what did Just pick the number that speaks to you… what did you get?
Had to do this one more time with the actual trend Had to do this one more time with the actual trending questions 🤭

Try this out with your spouse, partner, sibling, friend, whoever and see what they think!
Do I avoid eye contact or double down? 🤔 Do I avoid eye contact or double down? 🤔
My husband understood the assignment ✨ Highly reco My husband understood the assignment ✨
Highly recommend doing this with a loved one because human connection > trashy AI 😘
How to use multiple experience passes: 1. Go to t How to use multiple experience passes:

1. Go to the Disneyland app and click the three lines in the bottom right corner, then go to “my plans”
2. Your multi experience passes should come up here. Click “redeem” and then go to the link that says “find out where you can go.” This will show you which attractions you are able to use this pass on.
3. When you’re ready to use it, just click that redeem button and then scan into the lightning lane redemption spot, or take it to the cast member at the attraction to use it.
4. You do not have to reserve a time to use these, and there is no time limit on how long you have to use them, they just have to be used the same day you receive it

When you may get multi experience passes:
- If you have a lightning lane reservation and that attraction is down during your return time, it will convert to a multi experience passes should
- If you’re on an attraction that breaks down and you have to be evacuated
- On certain rides, if you’re past a certain point in line and the ride goes down, you may get one for that
- If you get lucky and get pixie dusted by cast members

Other important things to know:
- Not all attractions are available with these, the more popular ones are often excluded, but frequently tenet include attractions that do not offer lightning lane
- You can use them on attractions you’ve already used lightning lane multipass on, as long as it’s listed on the eligible attractions 
- It does not reset the clock in your lightning lane reservations, you can immediately make a new one even if you don’t use it or it hasn’t been 2 hours

If you have any other questions, drop them in the comments, I’d be happy to help!
Adults at kids prices tickets on all 3+ day ticket Adults at kids prices tickets on all 3+ day tickets and up to $50 off your hotel/ticket package will only be available to book until September 22!

Tickets can be used anytime now through the and of 2027, must be used within 13 days of first use, and can be purchased on their own or bundled with a hotel stay! And don’t forget, Disney WILL be raising their ticket prices in the next few weeks, so if you don’t want to pay more for your next Disneyland vacation, you need to book now!

Comment “TRIP” and I will send you the link to start booking!
The shop is now open! I’m doing things a little d The shop is now open!

I’m doing things a little differently this time, all available items are in my Etsy shop so just head the link in my bio or comment “SHOP” for the link! All items turnaround times/shipping estimates will show on their product page. 

There’s lots to choose from today including ears, beanies, sweatshirts, jewelry, and digital items as well!
DIY Haunted Mansion tombstones! I love adding thi DIY Haunted Mansion tombstones!

I love adding this to my front yard every Halloween, and they’re actually pretty simple to make. If you want the link to everything I used, comment “TOMBSTONES” and I will send everything your way!
Looking for a sweet treat on your next Disneyland Looking for a sweet treat on your next Disneyland vacation? These are my favorites that are usually available all the time, and don’t forget there may be other yummy seasonal items to try as well!
Don’t get caught up the crazy crowds at the end of Don’t get caught up the crazy crowds at the end of the night at Disneyland! 

Instead of getting stuck in the crowds on Main Street around fireworks, head over by Refreshment Corner and take the backstage exit! They usually have this open during the time around fireworks, during/after nighttime parades or after Fantasmic to help traffic flow more easily. It’s wide open,with lots of space, usually not packed, and provides a quick and easy exit from the parks with minimal stress. This is a great option especially if you have a mobility scooter, stroller, or service dog because crowds can be really hard to navigate in those cases. 

Try this out on your next visit!
Follow on Instagram

Products

  • Planning Disneyland Printable Guide Planning Disneyland Printable Guide $12.00
  • Disney Spellbook Pages Disney Spellbook Pages $10.00
  • Harry Potter Potion Labels Harry Potter Potion Labels $10.00

Copyright © 2026 · Theme by Blog Pixie

"Num Num Cookies!"
To improve your experience, this website uses cookies. If you continue, we will assume you are okay with this. Sounds good! No thanks! Read More
Privacy & Cookies Policy

Privacy Overview

This website uses cookies to improve your experience while you navigate through the website. Out of these cookies, the cookies that are categorized as necessary are stored on your browser as they are essential for the working of basic functionalities of the website. We also use third-party cookies that help us analyze and understand how you use this website. These cookies will be stored in your browser only with your consent. You also have the option to opt-out of these cookies. But opting out of some of these cookies may have an effect on your browsing experience.
Necessary
Always Enabled
Necessary cookies are absolutely essential for the website to function properly. This category only includes cookies that ensures basic functionalities and security features of the website. These cookies do not store any personal information.
Non-necessary
Any cookies that may not be particularly necessary for the website to function and is used specifically to collect user personal data via analytics, ads, other embedded contents are termed as non-necessary cookies. It is mandatory to procure user consent prior to running these cookies on your website.
SAVE & ACCEPT
✕