• Home
  • Disney
  • Recipes
  • DIY
  • Meet Jess
  • Disclosure & Privacy Policy
  • Contact
  • Shop Pure Magic Design Co.
  • Cart
    • Amazon
    • Email
    • Facebook
    • Instagram
    • Pinterest
    • YouTube

The Rambling Introvert

Your guide to the world of Disney and beyond

Categories: Disney, DIY

DIY Mickey Pumpkin Wreath

Fall is here and that means it’s time to decorate for the season! And no one decorates for Halloween like the Disney parks. Every single detail about the parks decor is absolute perfection and nothing says Halloween time like the seasonal Mickey pumpkins and wreaths that adorn the Disney parks during the fall. They truly are iconic staples for spooky season and now you can make your own Mickey pumpkin wreath at home! Let me show you step-by-step how to make this amazing wreath to add to your own spooky season decor!


**As an Amazon Associate I earn from qualifying purchases at no additional cost to you.**

You can shop everything I used for my Mickey pumpkin wreath here on my Amazon storefront.

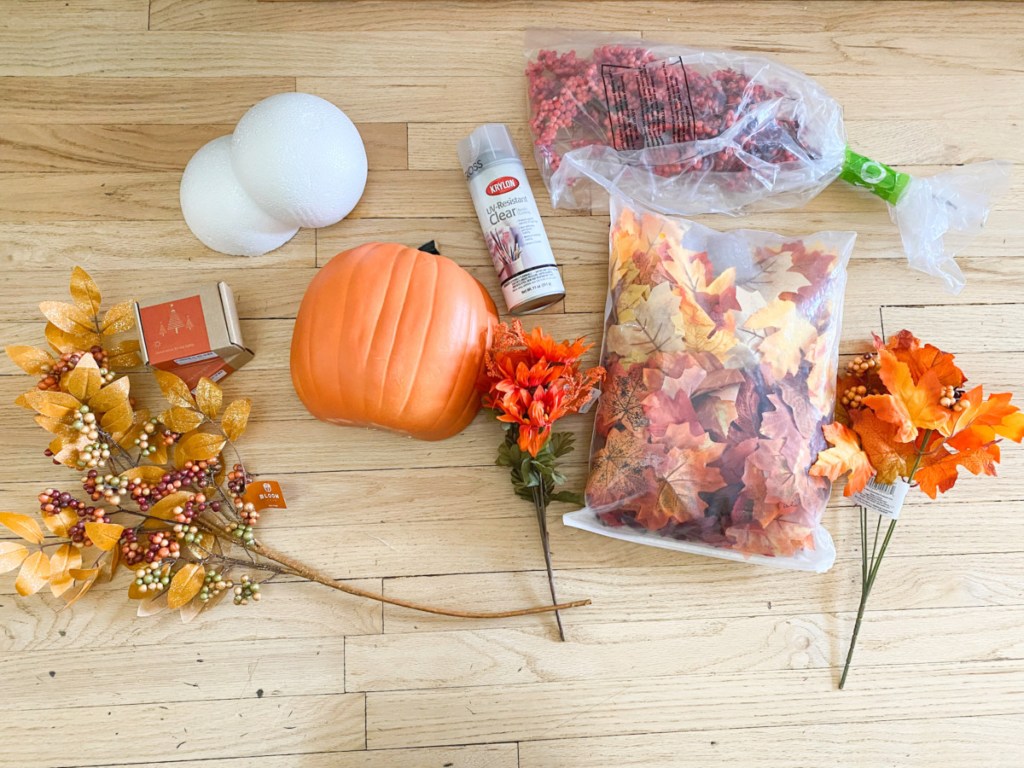
HERE’S WHAT YOU’LL NEED

  • 9 inch carvable pumpkin, cut in half
  • Fall leaves garland (I used 2 strands for the wreath and one for my lamp post)
  • 6 inch foam ball, cut in half
  • Battery powered fairy lights (I used two strands)
  • Fall leaves, berries, and flowers picks
  • 16 inch metal floral hoop
  • Floral wire
  • Black electrical tape
  • Bamboo skewers
  • Hot glue gun
  • Foam sheets
  • Craft paint
  • UV resistant clear gloss

HOW TO MAKE YOUR MICKEY WREATH

Step 1

To start, take your 16″ metal floral hoop and using a small piece of floral wire attach the circle on the garland to the hoop. Then, using black electrical tape, secure the end of your fall leaves garland just below the circle. Work your way around the hoop, taping the garland to the hoop every 6 inches or so to make sure the garland is staying along the hoop the entire way around.

Step 2

Once you have the entire garland taped to the hoop, repeat the process with the second garland starting where the first garland left off. My second strand didn’t make it all the way to the beginning point so there was a small spot that seemed a little more sparse than the rest of the hoop. Don’t worry about that, you can fill it in with other leaves later.

Step 3

Next, you want to add the fairy lights. Using electrical tape, secure one end of the strand to the hoop. Then, wrap the lights around the hoop until you use up the entire strand. You will want the battery pack to be at the bottom of the hoop. I used one strand of lights for this step.

Step 4

Next up, take your 9″ pumpkin and cut it in half using a hand saw. This will make it much easier to trace and cut out the face. Once it’s cut in half, you can either free hand the face onto the pumpkin or you can print off a photo and trace the face onto the pumpkin. This is also where you can get creative and do whichever face you’d like. If you’re a big fan of Blinky his face would look so cute on this!

Step 5

Now that you’ve got the face traced, it’s time to carve the face of your pumpkin! You can easily do this with an exacto knife, just make sure you go slowly so you don’t cause the pumpkin to tear as you go. I noticed as I did mine that it is much easier to push the shape out from the inside of the pumpkin. If you notice any rough areas after you pull our your pieces just smooth them out bit by bit with your exacto knife.

Step 6

Once your pumpkin’s face is all carved, it’s time to give Mickey some ears! You could add pumpkins for ears like Disneyland’s Mickey pumpkin or do the classic Mickey wreath look from Disney World with the rounded ears. For this, we’re going with the rounded ears. I got a 6″ foam ball and cut it in half with a hand saw to make my two ears. Then I put the circles up to my Mickey pumpkin to see how much of a curve to cut into them. Once I cut the curve into each ear, I placed them face down onto a foam sheet, traced them, and cut those out. Then I took a softball and made a slight indentation in the center of each foam ear so they had a little dimension and looked more like actual ears than rigid circles.

Now it’s time to paint! I mixed orange with some yellow, green, brown, and coral color to get the orange I ended up with. Just add and mix more colors until you are happy with the tone of orange. Then paint the Mickey ears, the foam circles you traced from the ears, and the Mickey pumpkin itself to ensure they all match. I also painted the inside of my Mickey pumpkins face yellow so there was some contrast where you can see the inside of the design I cut out.

Step 7

Once the paint dried on all of the pieces, I glued the foam sheets to the front of the foam circles so they had that smooth look. Then I took a skewer and broke it in half. I put half of the skewer into each ear about halfway and then skewered the ears into the pumpkin. I then pulled the ears out a little bit, applied a generous amount of hot glue and then pushed them back into the holes I had just created and let them set.

Step 8

Once I got the ears skewered on and glued in place, I secured them along the back and front seams with hot glue and touched them up with paint once it was set. I cut the skewers inside the pumpkin down so I had about an inch left to secure some wire to. I took the floral wire and wrapped it around the skewers multiple times and left about 10-12 inches of wire on both sides to secure to the hoop. Then I hot glued the wire wrapped around the skewer so it wouldn’t slide off or come lose.

Step 9

To make sure that the pumpkin would sit back into the wreath, I took the two sides of the wire on each side of the pumpkin and twisted them together about 3/4 of the way up. I then held the Mickey pumpkin up to the wreath to see exactly where I wanted it to sit. Once I had it in the right place I twisted the remaining parts of the floral wire around the metal hoop to secure the pumpkin above each ear so it was now hanging from the hoop.

Step 10

Once I had the pumpkin secured to the hoop, I wanted to make sure the pumpkin would sit back into the wreath nicely so I pressed the wire up to the foam ears to make an indentation. I then took my exacto knife and cut a slit in the back of the ears along that indentation and pressed the wire into each ear. Then I hot glued that seam to keep the wire from coming out. This step seriously made the biggest difference for the look and sturdiness of the wreath.

Step 11

Now that the structural part of the wreath is done, it’s time to pretty it up. Using hot glue, fill in any sparse spots with more leaves, berries, flowers, pumpkins, pinecones, whatever you want to include! Most of the berries, leaves, and flowers I added into my wreath I got from Joann’s but I found some for you here that would also work really well.

Step 12

Once your wreath is all prettied up, flip it over so you can see the inside of the Mickey. Take your second strand of the fairy lights and glue the end of your strand (the end without the battery pack) into the pumpkin. There will be a large chunk of the light strand left after this step, I wrapped mine around the lamp post I display my wreath on.

Step 13

Take a piece of the foam you put on the front of your ears and cut it down to fit inside your pumpkin just behind where you glued your lights in. Paint it a light yellow/orange color so it looks like the inside of a pumpkin.

Step 14

Take your piece of foam and place it into your pumpkin. You will want to cut a little notch in the bottom where your light strand comes out of the pumpkin. Once it’s in the right place, glue it to the sides of the pumpkin so that it stays in place.

Step 15

Now you want to protect that beautiful wreath! Take it outside and give it a nice coat of UV resistant clear gloss and allow it to air out before hanging it up.

Step 16

Now that your wreath is done, it’s time to get that bad boy out for everyone to see! You can put this on your front door or hang it from a post. I bought this cute solar powered lamp post for my front porch and used some black electrical tape to put a hook on it to hang my wreath. I took the remaining fairy light strand that I put inside the Mickey and wrapped it down the post. I then wrapped my post with another garland of leaves like I used in the wreath to tie it all together.

And there you have it! The cutest little Mickey pumpkin wreath for your own porch. And how cute it is it all lit up? I am so happy with how this one turned out!

I hope you all enjoy this DIY as much as I do. If you make your own Mickey pumpkin wreath, I would love to see how they turn out! Tag me @theramblingintrovert on Instagram or Facebook in your finished projects so I can see how they turned out!

Share this:

  • Share on Pinterest (Opens in new window) Pinterest
  • Share on Reddit (Opens in new window) Reddit
  • Share on X (Opens in new window) X
  • Share on Tumblr (Opens in new window) Tumblr
  • Share on Facebook (Opens in new window) Facebook
Tweet
Share
Pin47
Share
47 Shares

You may also like

About Jess

Jess is a Disney lover through and through and loves sharing her knowledge by sharing tips and tricks for the parks and her favorite products to help others have the most magical vacation possible.

Comments

  1. Hazel @ Pixie Dust Words

    October 11, 2021 at 3:32 pm

    Oh goodness, how cute is this?! It looks so simple to make as well! Will have to give this one a try!

    • Jess Vodden

      October 11, 2021 at 3:59 pm

      Thank you so much Hazel! I hope you enjoy it!

Meet Jess

Meet Jess

Hey there, I'm Jess and welcome to The Rambling Introvert!

As someone who loves Disney but doesn't get to visit as often as I would like, I created the Rambling Introvert to spread tips, tricks, and more to help you plan the most magical Disney vacation possible.

Here you will also find Disney recipes, DIY's, and more. So if you love Disney, this is the place for you!

More About Jess

  • Facebook
  • Instagram
  • Pinterest
  • YouTube

Search the Blog

Follow @theramblingintrovert

theramblingintrovert

✨Disneyland tips & tricks, magic at home, and a dash of real life
📍Utah
✨Book your trip & discount tickets 👇🏼

Can’t love it all 🤷🏻‍♀️ What are your no’s in the Can’t love it all 🤷🏻‍♀️

What are your no’s in the parks?
I’ve been sitting on posting this for weeks. I don I’ve been sitting on posting this for weeks. I don’t think there anything wrong with content creation and the parks, it can have lots of benefits for trip planning or for those who can’t experience the parks often, but I think more and more lately content creation is starting to detract from the experiences other people may have while in the parks.

What are your thoughts?
Let’s just pretend all this hasn’t been up for a m Let’s just pretend all this hasn’t been up for a month already 😏

Comment “LINK” and I’ll send you everything I used to get ready for Halloween this year!
2027 Disneyland calendars are here and available f 2027 Disneyland calendars are here and available for preorder now in my shop! 

All calendars should ship out within the next 6 weeks, but depending on production time, it could be sooner than that!

You can choose from 12x18 top bound or 8.5x11 center bound styles, with a matte or pearl finish (the pearl finish has a shimmer to the pages and I think makes colors look slightly more vibrant)

Shop now at the link in my bio or comment “CALENDAR” and I’ll send the link right to you!
If you’re visiting Disneyland in October, here’s w If you’re visiting Disneyland in October, here’s what you can expect:

CLOSURES
• Mad Tea Party- reopening TBD
• Indiana Jones- reopening TBD
• It’s a small world- closed 10/30-TBD

OTHER IMPORTANT DATES & EVENTS
* Halloween Time happening all month long
* Columbus Day/Indigenous Peoples’ Day on October 12th
* Fall break crowds will be hitting mostly the second and third weeks of the month
* Oogie Boogie bash nights on October 1st, 4th, 6th, 8th, 11th, 13th, 15th, 18th, 20th, 22nd, 25th, 27th, 29th, and 31st. DCA will close at 6 pm to all non ticketed guests.
* Halloween on October 31st
My favorite ride evacuation experience was on the My favorite ride evacuation experience was on the Haunted Mansion. We got stuck right at the bottom of the last hill looking at the caretaker and his dog so when they evacuated us, we got to walk through the entire graveyard scene with the lights on which was so cool to see the little things you don’t normally notice, as well as the mechanics behind a lot of the ride elements. Definitely my favorite ride evacuation I’ve ever had!

What about you? Which ride would you pick, or what’s your most interesting evacuation story?
Just pick the number that speaks to you… what did Just pick the number that speaks to you… what did you get?
Had to do this one more time with the actual trend Had to do this one more time with the actual trending questions 🤭

Try this out with your spouse, partner, sibling, friend, whoever and see what they think!
Do I avoid eye contact or double down? 🤔 Do I avoid eye contact or double down? 🤔
My husband understood the assignment ✨ Highly reco My husband understood the assignment ✨
Highly recommend doing this with a loved one because human connection > trashy AI 😘
How to use multiple experience passes: 1. Go to t How to use multiple experience passes:

1. Go to the Disneyland app and click the three lines in the bottom right corner, then go to “my plans”
2. Your multi experience passes should come up here. Click “redeem” and then go to the link that says “find out where you can go.” This will show you which attractions you are able to use this pass on.
3. When you’re ready to use it, just click that redeem button and then scan into the lightning lane redemption spot, or take it to the cast member at the attraction to use it.
4. You do not have to reserve a time to use these, and there is no time limit on how long you have to use them, they just have to be used the same day you receive it

When you may get multi experience passes:
- If you have a lightning lane reservation and that attraction is down during your return time, it will convert to a multi experience passes should
- If you’re on an attraction that breaks down and you have to be evacuated
- On certain rides, if you’re past a certain point in line and the ride goes down, you may get one for that
- If you get lucky and get pixie dusted by cast members

Other important things to know:
- Not all attractions are available with these, the more popular ones are often excluded, but frequently tenet include attractions that do not offer lightning lane
- You can use them on attractions you’ve already used lightning lane multipass on, as long as it’s listed on the eligible attractions 
- It does not reset the clock in your lightning lane reservations, you can immediately make a new one even if you don’t use it or it hasn’t been 2 hours

If you have any other questions, drop them in the comments, I’d be happy to help!
Adults at kids prices tickets on all 3+ day ticket Adults at kids prices tickets on all 3+ day tickets and up to $50 off your hotel/ticket package will only be available to book until September 22!

Tickets can be used anytime now through the and of 2027, must be used within 13 days of first use, and can be purchased on their own or bundled with a hotel stay! And don’t forget, Disney WILL be raising their ticket prices in the next few weeks, so if you don’t want to pay more for your next Disneyland vacation, you need to book now!

Comment “TRIP” and I will send you the link to start booking!
The shop is now open! I’m doing things a little d The shop is now open!

I’m doing things a little differently this time, all available items are in my Etsy shop so just head the link in my bio or comment “SHOP” for the link! All items turnaround times/shipping estimates will show on their product page. 

There’s lots to choose from today including ears, beanies, sweatshirts, jewelry, and digital items as well!
DIY Haunted Mansion tombstones! I love adding thi DIY Haunted Mansion tombstones!

I love adding this to my front yard every Halloween, and they’re actually pretty simple to make. If you want the link to everything I used, comment “TOMBSTONES” and I will send everything your way!
Looking for a sweet treat on your next Disneyland Looking for a sweet treat on your next Disneyland vacation? These are my favorites that are usually available all the time, and don’t forget there may be other yummy seasonal items to try as well!
Don’t get caught up the crazy crowds at the end of Don’t get caught up the crazy crowds at the end of the night at Disneyland! 

Instead of getting stuck in the crowds on Main Street around fireworks, head over by Refreshment Corner and take the backstage exit! They usually have this open during the time around fireworks, during/after nighttime parades or after Fantasmic to help traffic flow more easily. It’s wide open,with lots of space, usually not packed, and provides a quick and easy exit from the parks with minimal stress. This is a great option especially if you have a mobility scooter, stroller, or service dog because crowds can be really hard to navigate in those cases. 

Try this out on your next visit!
Social media is weird and I’m confused 😅 What is Social media is weird and I’m confused 😅

What is going on??
If you’re into finding hidden mickeys, check out t If you’re into finding hidden mickeys, check out this one that you don’t even need a park ticket for!

Just head to the fountain in Downtown Disney and head to the right hand side and look really close!
It’s been ages since I’ve done one of these, so le It’s been ages since I’ve done one of these, so let’s see what you’ve got! 

Drop your answers in the comments, then check the pinned comment for the correct answer!👇🏼

#soundsofdisney #disneyasmr #disneysounds
Same thing though, right? 😏 Same thing though, right? 😏
Follow on Instagram

Products

  • Planning Disneyland Printable Guide Planning Disneyland Printable Guide $12.00
  • Disney Spellbook Pages Disney Spellbook Pages $10.00
  • Harry Potter Potion Labels Harry Potter Potion Labels $10.00

Copyright © 2026 · Theme by Blog Pixie

"Num Num Cookies!"
To improve your experience, this website uses cookies. If you continue, we will assume you are okay with this. Sounds good! No thanks! Read More
Privacy & Cookies Policy

Privacy Overview

This website uses cookies to improve your experience while you navigate through the website. Out of these cookies, the cookies that are categorized as necessary are stored on your browser as they are essential for the working of basic functionalities of the website. We also use third-party cookies that help us analyze and understand how you use this website. These cookies will be stored in your browser only with your consent. You also have the option to opt-out of these cookies. But opting out of some of these cookies may have an effect on your browsing experience.
Necessary
Always Enabled
Necessary cookies are absolutely essential for the website to function properly. This category only includes cookies that ensures basic functionalities and security features of the website. These cookies do not store any personal information.
Non-necessary
Any cookies that may not be particularly necessary for the website to function and is used specifically to collect user personal data via analytics, ads, other embedded contents are termed as non-necessary cookies. It is mandatory to procure user consent prior to running these cookies on your website.
SAVE & ACCEPT
✕